in this weeks living vintage, i promised i would show you how to make the light cover/lamp shade hanging in our recently redecorated bedroom. well i'm not one to go back on my word, so follow me through the process of making your very own lamp shade!
as i mentioned in the living vintage post, we just had a bare bulb fixture in our bedroom, which looked horrible and didn't do any favors for the ambient light in the room. on a limited budget, i knew that whatever i chose to fix this issue had to be diy, and ideally made with things i already had.
after accessing my materials situation, i had a few things i knew i wanted to incorporate: vintage maps and some old wire mesh.
but how to turn these into a lamp shade? i've created various things with quilting hoops before, so i figured there must be a way to create a lamp shade using a larger sized quilting hoop or two.
i started looking online for inspiration and noticed this tutorial on 'the keylor family' blog. i like the clean lines of drum style shades and having seen similar tutorials on instructables, i figured this would be a simple enough project to tackle. and thus this project got it's legs.
so let's get started!
materials needed:
two quilting hoops in a size that suits your needs. i chose the 23 inch hoops.
you can find quilting hoops at most any craft store.
a length of wire mesh slightly longer than the circumference of your hoops. wire mesh is available in several different gauges and finishes. you could also use chicken wire for a more country look.
find wire mesh at most hardware stores.
for the lining of the shade you can choose from a variety of materials.
i used an old paper map, but you could use fabric, feed sacks, other types of paper,
even a laminated photo collage.
whatever you choose, make sure you have a long enough piece to match the circumference of the quilting hoops.
hanging the shade may depend upon the type of fixture you're covering up. since my fixture was just a bare bulb, i chose a simple method (which i'll cover at the end). for this you'll need
4 eye hooks
4 s hooks
4 steel safety pin fasteners
all of these are available at any hardware store.
now for the assembly:
first make sure your wire mesh and paper or fabric are cut to the proper size.
in order to cut the wire mesh you'll need work gloves and a sturdy pair of wire cutters. this is a tedious task, but it goes pretty quickly.
cut the wire a square or two at a time, cutting as close to the corner as possible so there are no sharp edges sticking up.
now that your materials are the right size, take the quilting hoops apart. for this project you will only need the inside hoop. save the outer hoops for another project.
begin to form the shade. take your map (or whatever material you are using) and line it up with the edge of one of the hoops. use scotch tape to affix the map to the hoop. do this every few inches along the edge of the hoop. if you're using fabric you may want to use a staple gun to attach it to the hoop.
once you've completed the top hoop, repeat with the bottom hoop. when you've finished you should have the shell of a lamp shade.
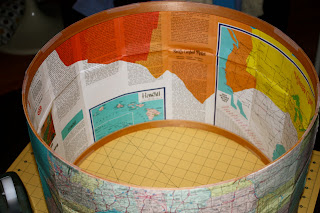
now take your wire mesh and very carefully wrap it around the shell of the shade. be careful not to puncture the paper with the wire edges.
my original idea was to use both parts of the quilting hoop and sandwich the wire mesh between the two hoops. the wire mesh i had was too thick to do this, so in order to attach the wire to the shell of the shade, i simply measured the mesh so it would be a few inches longer than the height of my shade, and then folded the excess around the bottom hoop. you can see it at the bottom in this photo:
you're almost done! if you have any wrinkles in the paper (like mine does in the photo above), gently straighten them out by pulling on the top hoop until the wrinkle is gone.
now you're ready to hang your shade. begin by measuring to find a halfway point of the circle. once you've found it, attach a safety pin fastener to the top square of the wire mesh on each side. repeat so that you have four evenly spaced fasteners, one in each quarter of the circle.
next, using the shade as your guide, mark the four spots on the ceiling where you will hang the shade from. screw in the eye screws in those spots. attach the s hooks to the eye screws. using the rounded ends of the safety pin fasteners, attach the shade to the s hooks.
you could choose to cover the bottom of the shade as well. the tutorial i mentioned earlier has great instructions on how to do that. i decided to leave mine open. since you would be able to see the light bulbs, i picked out some wonderful reproduction tungsten filament bulbs from rejuvenation.
tah-dah! your very own handmade lamp shade!
this project is really only limited by your imagination. if you try it for yourself i would love to see! drop me a line with some photos and i'll be glad to share your project here!


No comments:
Post a Comment